


Connect OScam to OScam using Newcamd protocol
I find newcamd to be ideal protocol for connecting local card from one OScam server to other OScam server or client. How to enable such connection? First you need to go to newcamd configuration under OScam WebIf (Configuration/Newcamd) and input port and key.
PORT looks something like this: 15001@0B00:000000. You need to be aware of the fact that newcamd only works like this: one port with one caid. You cannot use one port for two or more caids.
KEY on the other hand looks like this: 0102030405060708091011121314. This is default key, you can use something else of course.
Client or server (where you want to transfer card to)
[reader]
label = XXX
protocol = newcamd
device = IP or DNS address,port
key = 0102030405060708091011121314
user = username
password = password
connectoninit = 1
group = anything you want
blockemm-unknown = 1
blockemm-u = 1
blockemm-s = 1
blockemm-g = 1
dropbadcws = 1
audisabled = 1
Server (to which card is physically connected)
[account]
user = username
pwd = password
au = 1
group = group needs to be the same as the one that is assigned to your card
As you can see, newcamd configuration is fairly easy. If you have any questions, do not hesitate to leave a comment.
For discussion please visit this thread here:
https://www.satnigmo.com/forum/index.php?threads/oscam-to-oscam-newcamd-protocol.544/
OScam with improved DVB-Api
User theparasol added many enhancements to DVBapi with version 8680 (05.06.2013). One of interesting enhancements is new PMT mode.
If you are using OpenPLi 3.0 then I suggest you select mode PMT 6 (you can find this option in OScam WebIf under Configuration/DVB-Api) and you can expect faster zapping! I tested this feature on my Vu+ Duo and you can really notice the difference. This mode is not available on other images, only on OpenPLi and OpenPLi derivates!
Do not forget to select option ReopenOnZap. If you not, then you will get black screen after a few zaps. You do not want that 😉
Install OScam on VPS
Recently I acquired cheap VPS at MisterHost.de. They offer cheap VPS packages and are suitable for running OScam. My other suggestions would be colorhost.de (has lower upload speeds though) and contabo.de (prices are from 9.99EUR here). Installing OScam on VPS is an easy task and here is how you do it.
EDIT: I also tested EDIS.at and I can say this VPS is even better than MisterHost.de. It offers higher upload speeds for same price and upload is very important, especially if you are using OScam with its cache-ex function!
First you need to compile OScam. I suggest you compile it using Simplebuild script. Please check my Simplebuild article here on my blog. Simplebuild will also automatically install all missing packages that are needed for successful compile.
After compiling OScam for you VPS, you need to put oscam executable file to /usr/local/bin folder on your VPS server. Use 0755 permissions for this file. Then you need to put oscam configuration files to /usr/local/etc folder. You need oscam.user, oscam.conf and oscam.server. Just create empty files with these names and upload them to /usr/local/etc folder. One setting is very important in oscam.user and that is httpallowed! You should set this to: httpallowed = IPOFYOURCOMPUTER (NOT LOCAL NETWORK IP!!)
Now you need to run oscam with this command: ./oscam -b
OScam should be running now. You wont be able to connect to WebIf right away. For this you need to enter this in oscam.conf file:
[webif]
httpport = 16002
httpuser = root
httppwd = xxx
httprefresh = 10
httpallowed = WAN IP of your computer (use website whatismyip.com)
If you want that OScam starts automatically with system boot, then I suggest that you install Webmin which is free software for maintaining Linux servers. If you decide to use Debian on VPS (as I did), then follow this tutorial to install Webmin on Debian: http://www.webmin.com/deb.html. If you decide to use Ubuntu 12.04, please check tutorial on TheWebPrograms blog where you will get all information about how to install Webmin in Ubuntu 12.04! You can also use newer versions of Ubuntu.
After installation you will be able to enter webmin with this link: YOURVPSIP:10000
Before entering this link, you need to alter one setting in file miniserv.conf which is located in /etc/webmin/ folder. Open that file and change setting ssl=1 to ssl=0. Save it and enter this command in telnet: service webmin restart. Webmin will restart and remote access to Webmin should be working now. Easy 🙂
For automatic start of OScam, just visit Cronjob section of Webmin and create new cronjob. Use these settings:
Execute cron job as: root
Command: /usr/local/bin/oscam -b
Want to execute …: When system boots
Save it and OScam will now start with system boot. I think I covered all aspects of installing OScam on VPS. If you have any additional questions or you think that I missed something, please add a comment! Thanks for reading my blog.
ADDITION:
Thanks to the commenter, I will also explain how to run two or more OScams at the same time. Its not that hard, you will see. Here is what you need to know:
1. You need to have two OScam executable files in /usr/local/bin folder. First one should be named “oscam1”, second one should be named “oscam2”!
2. Now you need to create alternate configuration files folder for your second OScam (oscam2).I recommend that you use name “secondoscam”. End result should look like this: /usr/local/etc/secondoscam/
3. Now go to /usr/local/bin and execute this command in telnet:
./oscam1 -b -c /usr/local/etc/
and
./oscam2 -b -c /usr/local/etc/secondoscam/
4. Edit your oscam.conf files in a way that every OScam will run with different WebIf ports, so you will be able to access them!
5. If you want that OScams start automatically with system start, please use Webmin and its Cronjob function. Here is one exemple what you need tu use under “Command:” option:
Command: /usr/local/bin/oscam1 -b -c /usr/local/etc/
For discussion please visit this forum thread:
https://www.satnigmo.com/forum/index.php?threads/install-oscam-on-vps.537/
OScam Tutorials Collection
Here is an collection of all OScam Tutorials that are available on this blog. I hope that browsing among all these is a bit easier now!
- Connect OScam to OScam using Newcamd protocol
- OScam with improved DVB-Api
- Install OScam on VPS
- OScam Tutorials Collection
- Compile OScam with SimpleBuild Script (2020 Edition)
- Oscam and Gbox
- Oscam and Loadbalancer
- Where to find oscam.services information?
- oscam.services Creator
- Connect OScam with MGcamd
- Optimal settings for OScam Cache-EX MODE 3
- OScam Cache-EX Mode 3 Tutorial
- Connect OScam with CCcam using CCcam protocol
- ins7e11 = 15 for NDS cards
- OScam Setup
- OScam Smargo
- OScam to OScam using Camd35 protocol
- FailBan and OScam
- How to get Smargo Serial:Reader info for use in Oscam
- Cyfra Update Problem
- Compile OSCam on Fedora
- Block unwanted providers on OScam
- OScam and DVBApi
- How to use Oscam Config Creator
- Oscam Config Creator Download (24.12.2012)
- What is OScam
- OScam Anticascading
- Compile OScam on ClearOS 5.1
- Compile OScam on Debian (UPDATED: 05.01.2020)
- Compile OScam on Ubuntu (UPDATED: 05.01.2020)
- Connect OScam and CCcam using Newcamd protocol
- OScam and DVBAPI
- Block EMMs in OScam
- Connect OScam with CCcam using Camd35 protocol
Compile OScam with SimpleBuild Script (2020 Edition)
Simplebuild script simplifies compiling OScam for different platforms. It is made by user “Gorgone” from StreamBoard forum. Now you can easily make OScam binaries for popular ARM, MIPSel (Vu+, Dreambox, Xtrend, Gigablue, Clarke-Tech) or SH4 receivers. There are also toolchains for other platforms like routers, RaspberryPi, x64/x86, etc. I decided to test this script and test-compiled two binaries, one for my OMV (Debian) server and one for my Vu+ Duo4 satellite receiver with latest OpenPLi 7.2. Installing SimpleBuild script is pretty straightforward and does not demand a lot of knowledge. Here are steps for Linux users (connect to your server using Putty and SSH):
git clone https://github.com/gorgone/s3_releases.git
After entering this command, you get this:

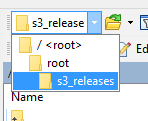
Now continue with (in my case I have folder “s3_releases” under “root”):
cd s3_releases
then type:
./s3 menu
There are additional options beside “menu”. Short list:
./s3 update_me #online update (with this one, you update the whole script)
./s3 fix_me #repair scriptThese two are more interesting. They enable you to add emu functionality into OScam. By default emu is not available because it is not part of official OScam git. It is available on different git.
./s3 update_emu #get latest oscam-emu
./s3 enable_emu #patch actual svn with emu
After some initial checking and downloading of latest SVN, you should get something like this:

You can move around with UP and DOWN arrows on your keyboard. Select “Continue – continue with local SVN rxxxx”. You get:

There are two most important options: “ADD” and “NATIVE” if you want to compile OScam for your PC (if you are running this script on Linux server). I first added toolchain for my Vu+ Duo4k ARM receiver (select solo4k toolchain) and then I selected option “NATIVE” which built OScam for my Debian (OMV 5.x) server where I am currently running OScam.


You can see that are quite a few toolchains to select from. You will be probably most interested in mipsoe20 or solo4k toolchains, maybe even arm_dream if you have 4k Dreambox receiver. Select desired toolchaind and press Enter. After some “loading”, you should be thrown back to previous menu with one addition. You will be able to select “solo4k” toolchain. Check out picture below:

Now select “solo4k” toolchain and press Enter. You should get:

Three important options here. First one is obviously “Build”. 2nd one is “Configure” and 3rd one is “Edit_conf_dir”. Lets select “Configure” first:

You can leave everything as is and go back OR continue with tinkering and adding new options. For example, you can go into “Select oscam modules” and add or remove different Add-ons:


You can add for example “Cache exchange” or “CW Cycle Check” support. For new users these functions are not important but when you get advanced, you know where to get them! You select or un-select by pressing “space” bar on your keyboard. With left and right arrow on your keyboard you are switching between OK and Cancel buttons at the bottom. Press OK after satisfied and you will get thrown back to previous menu. If you add EMU support to OScam, you will also get two additional add-ons at the bottom – they are enabled by default:

Another interesting part is “Cardreaders”, especially if you have external cardreader like Smargo or Omnikey (pcsc).

After satisfied, move to “Save” and press Enter. If you have Omnikey reader, you also need to go into menu “Oscam_Extra” and select “USE_PCSC”.

Now confirm with OK and go back. There is another interesting option “Build_Extra” which comes handy if you want to add outside patches to your OScam. This is already advanced usage, so I dont think its appropriate to go into details here. Now go back to build menu.
Now select “EDIT_CONF_DIR”. Here you will add config path (location of your oscam files). If you use OScam on some linux distro, like I do, then I suggest:
/usr/local/etc
If you use OpenPLi for example, you need to enter:
/var/etc/tuxbox/config/oscam

Move to OK and press Enter. You should be done now, you can go to “Build” (build oscam now) and press Enter. Oscam binary will be created in a few seconds, it depends on the CPU power of your PC. In order to download it, find s3_releases folder and open folder “binaries”. Files should be there:

Use files which do not have “debug” at the end. You will have to rename it to “oscam”, also do not forget to change permissions to 0755 after uploading.
Conclusion
Gorgone did really great job here and compiling OScam is now easier task than ever. You can compare this process with process which is written in my other compiling tutorials. Not only that SimpleBuild is easier to use, you can also easily compile OScam for different platforms, you can select/deselect different OScam modules, etc. As you can see, this script enables you to configure many many different options. Currently there is nothing better out there!
For discussion please visit this thread here:
https://www.satnigmo.com/forum/index.php?threads/compile-oscam-with-simplebuild.546/
