


Oscam and Loadbalancer
Loadbalancing feature in OScam helps to determine which of the configured readers should be used to serve an ECM request. This is especially handy if you have two identical local cards or large number of cccam/newcamd or other readers. I will present you my loadbalancing configuration that i use on my OScam server.
First you need to visit global/loadbalancer section of WebIF. Then search for these settings:
lb_mode                       = 1
lb_save                       = 100
lb_reopen_mode                = 1
lb_savepath                   = /usr/local/etc/stats

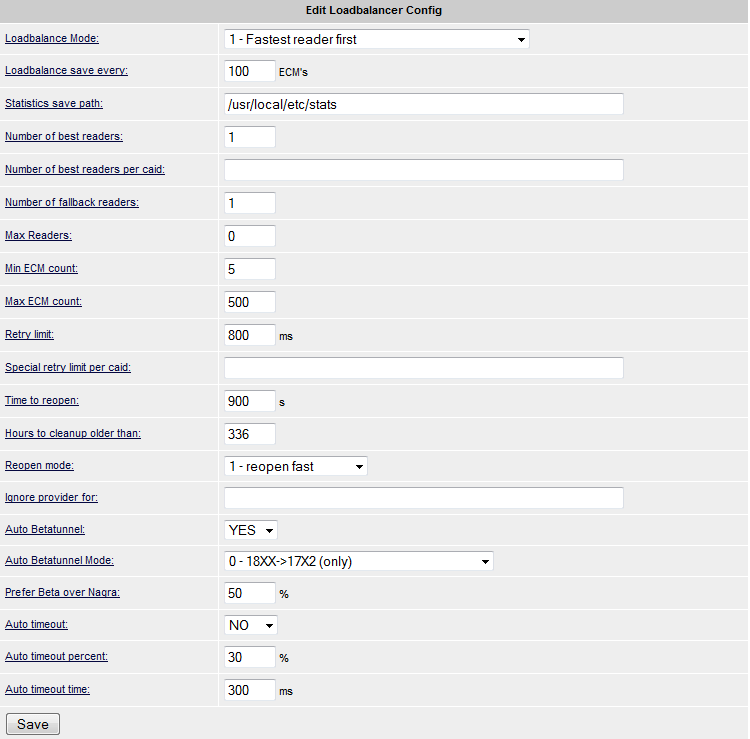
lb_mode = 1 means that the weight for a reader is divided by the average response time of requests sent to the reader, i.e. lower average response time means higher priority. My recommendation is that you use mode 1.
lb_save = 100 means that stats file is updated every 100 ecm. If you have OScam on your PC (more CPU power) than you can decrease this setting to 50 or even lower. If you have OScam on satellite receiver then you should leave default value which is 100.
lb_reopen_mode = 1 is my recommended setting.
lb_savepath can be changed. I use /usr/local/etc/stats but you can use something else if you want or need.
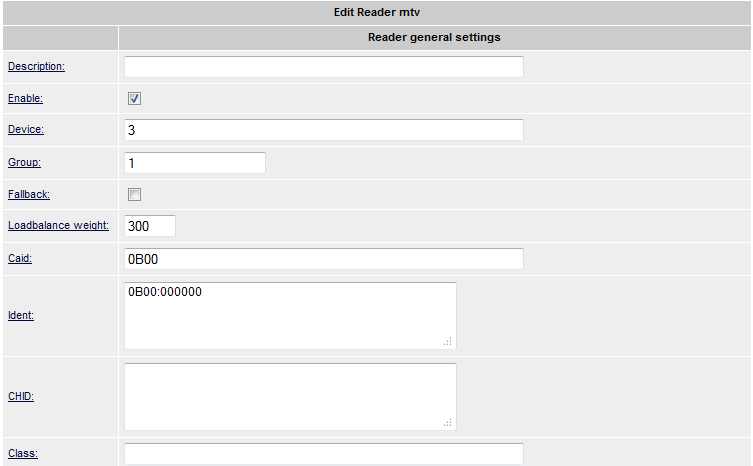
You do not need to change anything else here. Now you need to visit reader part of WebIF and modify lb_weight value. I suggest that you put lb_weight = 300 if you have local cards. This means that these local cards will have priority over normal readers (cccam/newcamd/camd35, etc.). For other readers you can just leave default value which is 100. If you have 0100 Cyfra local card, you probably do not want that OScam uses this card from cccam readers. Well, loadbalancing will help you achieving this goal.
I think I covered all loadbalancing basics and you are now good to go. If you have any questions, please use “Contact Us” form or leave a comment!
Top 3 skins for OpenPLi
These skins can only be used with OpenPLi. If you will use them with other images you can get booting problems or green screens (restarts). Two of them are already available via OpenPLi feed, one is only available on PLi forum.
1. PLACE = MetrixHD skin by iMaxxx and modified by Taykun345 from PLi forum


Skin uses very simple graphics and therefore it is suitable for weaker receivers. Simple graphics does not mean that this skin looks bad, its just that it tries to mimic Windows Phone styling. Ipk file can be found on OpenPLi forum and it cannot be downloaded from OpenPLi feed (yet)!
2. PLACE = MoodBlue HD skin by Army and modified by Taykun345 from PLi forum


Skin is made by Army who is working with BlackHole team. He really knows how to make good graphics but coding is a bit less good. Skin uses dark colors and it is even better if you like “night” skins. It was my skin of choice for many months, then i switched to MetrixHD skin which was released recently! Skin is ready to be downloaded from OpenPLi feed!
3. PLACE = MX-HD2 skin by Matrix10 and modified by Taykun345 from PLi forum


Skin is made by Matrix10 who is also working with BlackHole team. Very nice graphics and coding style! Skin was donated to OpenPLi by Matrix10 himself and because of that is also available on OpenPLi. It is a bit bright, so it is not suitable for users who do not like bright skins. Especially at night it can be a bit annoying to have such bright colors. Originally it was even brighter but author provided darker graphics! Skin is ready to be downloaded from OpenPLi feed!
All images are taken from OpenPLi forum, all credits go to Taykun345.
Translating in OpenPLi (Enigma 2)
Are you using OpenPLi but you language is poorly translated and you want to improve it? I will try to provide basic info, how to start translating!
1. First go to this page: http://openpli.git.sourceforge.net/git/gitweb.cgi?p=openpli/enigma2;a=tree;f=po;h=c1f494abfeb9e44fc0e78a709286ca53209082f0;hb=HEAD
2. Find your language and click with your right mouse button on “RAW”. Then select “Save Target As” in order to download language file (x.po) to your PC.
3. You can use to types of programs to edit .po files. Notepad++ and similar editors OR POEdit software which is specially made for editing .po files and i strongly recommend using this piece of software.
4. When you are finished with editing, save .po file and send it to OpenPLi admins. On their forum there is dedicated topic where everyone can post their newest translations. Link is: http://openpli.org/forums/topic/21479-translations-for-enigma-2-please-post-them-here/
5. OpenPLi is regularly adding new strings, so you can expect many untranslated strings/words.
How to move epg.dat to USB stick on OpenPLi image?
This article is intended for those who are using OpenPLi image. This image is my favourite but it lacks some features that you would expect in such great image. One of those features is epg.dat position. By default you cannot change position of epg.dat file. It is always located on hard drive. Well, this can be changed 🙂 What do we need? USB stick, FTP access to receiver and two lines that need to be added to settings file which is located in /etc/enigma2/ folder. Here is more info:
1. First you need to format your stick to FAT32 and put it in your receiver. OpenPLi does support advanced mount options, so please name your USB stick as “USB” in Windows. That way, OpenPLi will automatically detect your stick as USB.
2. Connect to your receiver using FTP protocol. Go to /media/usb folder and create new file epg.dat. Then put 0644 permissions to this file.
3. Now go to /etc/enigma2/ folder and find file named “settings”. Open this file with notepad++ and add these two lines:
config.misc.epgcache_filename=/media/usb/epg.dat
config.misc.epgcachepath=/media/usb/
4. Save the file and restart your receiver. After restart please check if your USB stick is still properly mounted and if epg.dat is still present on it. If not, then you have done something wrong.
5. Start XMLTV Import plugin and download EPG data. When downloading is finished, restart Enigma 2 in order to save this data to epg.dat file. After restart check the size of this file, using FTP protocol. If you will see different size than 0, then EPG data is succesfully written to epg.dat file!
6. For more information use comment system, thanks.
Install Ubuntu 12.04 Server on 4GB USB stick
Few days ago i decided to update my server. I was running old Fedora 14 (Amahi) and update to Fedora 15 wasnt possible because of Amahi installation. Amahi recently switched over to Ubuntu and they abandoned support for Fedora 16. Well, even if update to F16 would be possible, i wouldnt update because Amahi isnt that useful in my opinion. Many apps are payable and you need to install them manually if you want to get them for free.
Therefore i decided to install Ubuntu 12.04 on 4GB USB stick. Why on USB stick? That is because i use my server for only three things: torrents (Transmission), OScam and CCcam. 4GB USB stick seemed like a great alternative to ordinary HDD (i was running F14 on 200GB HDD that came with the HP Microserver N36L). EDIT: I now suggest that you rather use 8GB or 16GB. Its better because 4GB can soon become abit tight and you will run out of space 🙂
You may be asking yourself now, how is it possible to install Ubuntu 12.04 Server on such small storage device. Well its possible without any problems. Just check this page: http://athlon1900.dyndns.tv/OsirisCS-Ubuntu12/Allgemeines/
Here you can find x86 version of Ubuntu 12.04. Sorry, no x64 version on this site. Size of .ISO file is only 27MB which is just crazy low number! A lot of packages are missing but you can download them manually so thats not a problem.
Here is install procedure:
1. STEP
Find 4GB or larger USB stick. 2GB is too small for Ubuntu installation!
2. STEP
Remove old HDD with Linux OS (if you have it) and use your chosen USB stick. You also need to change boot priority in BIOS. USB stick should boot first. I have HP Microserver that has USB port on motherboard and when it detect USB stick in this port, it automatically boots from this USB. Very neat feature!
3. STEP
Follow on screen instructions. Installation is not hard so i will not go into details here.
4. STEP
Ubuntu will boot into command line mode after installation. If you are not familiar with command line (terminal), then walk away from this tutorial! Now you need to create root password. Use these commands:
sudo passwd root
Ubuntu will then ask you for password. It should look something like this:
[sudo] password for ramesh:
Enter new UNIX password:
Retype new UNIX password:
passwd: password updated successfully
5. STEP
Now you need to set up auto login with user root. Use this command in terminal:
nano /etc/init/tty1.conf
Now you search for something like this:
exec /sbin/getty -8 38400 tty1 -a root
You see root at the end? In default installation there wont be root at the end of this line. You need to replace default value (i dont remember now what was there by default) with root! When you are done with editing, press CTRL-X and then confirm changes with button Y. Thats it. After reboot you wont have to enter username and password! You will be automatically login as user root. Nice!
6. STEP
Now i would recommend that you install WEBMIN which is very useful if you want to set up network shares or change some other settings. You need to do this:
sudo apt-get install perl libnet-ssleay-perl openssl libauthen-pam-perl libpam-runtime libio-pty-perl apt-show-versions python
Then you run this command:
wget http://prdownloads.sourceforge.net/webadmin/webmin_1.590_all.deb
and the this one:
sudo dpkg -i webmin_1.590_all.deb
Thats easy right? Webmin will be then accessible through port 1000 = http://SERVERIP:10000/
7. STEP
Be sure to install OpenSSH package during Ubuntu installation. If you dont select this, you have to install it afterwards. Just use apt-get install openssh-server openssh-client command! OpenSSH enables you to connect to your server using Putty and SSH connection!
8. STEP
If you want, you can also install Transmission. Use this command:
apt-get install transmission-daemon
This will only install daemon and not a client. You dont need this on headless server that we are trying to build or make 🙂 Now connect to your server using FTP (i suggest WINSCP) and search for transmission-daemon file in /etc/init.d/ folder. Open it with Notepad++ and search for this:
NAME=transmission-daemon
DAEMON=/usr/bin/$NAME
USER=debian-transmission
STOP_TIMEOUT=30
Replace this with these lines:
NAME=transmission-daemon
DAEMON=/usr/bin/$NAME
USER=root
STOP_TIMEOUT=30
Now we need to edit settings.json. I suggest you use these settings:
{
    "alt-speed-down": 50,
    "alt-speed-enabled": false,
    "alt-speed-time-begin": 540,
    "alt-speed-time-day": 127,
    "alt-speed-time-enabled": false,
    "alt-speed-time-end": 1020,
    "alt-speed-up": 50,
    "bind-address-ipv4": "0.0.0.0",
    "bind-address-ipv6": "::",
    "blocklist-enabled": false,
    "blocklist-url": "http://www.example.com/blocklist",
    "cache-size-mb": 4,
    "dht-enabled": true,
    "download-dir": "/mnt/500GB/Torrents",
    "download-limit": 100,
    "download-limit-enabled": 0,
    "download-queue-enabled": true,
    "download-queue-size": 5,
    "encryption": 1,
    "idle-seeding-limit": 30,
    "idle-seeding-limit-enabled": false,
    "incomplete-dir": "/root/Downloads",
    "incomplete-dir-enabled": false,
    "lpd-enabled": false,
    "max-peers-global": 200,
    "message-level": 2,
    "peer-congestion-algorithm": "",
    "peer-limit-global": 240,
    "peer-limit-per-torrent": 60,
    "peer-port": 51413,
    "peer-port-random-high": 65535,
    "peer-port-random-low": 49152,
    "peer-port-random-on-start": false,
    "peer-socket-tos": "default",
    "pex-enabled": true,
    "port-forwarding-enabled": false,
    "preallocation": 1,
    "prefetch-enabled": 1,
    "queue-stalled-enabled": true,
    "queue-stalled-minutes": 30,
    "ratio-limit": 2,
    "ratio-limit-enabled": false,
    "rename-partial-files": true,
    "rpc-authentication-required": false,
    "rpc-bind-address": "0.0.0.0",
    "rpc-enabled": true,
    "rpc-password": "{9e73614bdbc1012766d2d4f864650f956281c5feGBTlCrfH",
    "rpc-port": 9091,
    "rpc-url": "/transmission/",
    "rpc-username": "",
    "rpc-whitelist": "127.0.0.1",
    "rpc-whitelist-enabled": false,
    "scrape-paused-torrents-enabled": true,
    "script-torrent-done-enabled": false,
    "script-torrent-done-filename": "",
    "seed-queue-enabled": false,
    "seed-queue-size": 10,
    "speed-limit-down": 100,
    "speed-limit-down-enabled": false,
    "speed-limit-up": 100,
    "speed-limit-up-enabled": false,
    "start-added-torrents": true,
    "trash-original-torrent-files": false,
    "umask": 0,
    "upload-limit": 100,
    "upload-limit-enabled": 0,
    "upload-slots-per-torrent": 14,
    "utp-enabled": true
}
Line that is bold need to be changed, according to your setup. Also, umask needs to be set to value 0! Default value is 18 and its not good. Where is this settings.json file? You can find it in folder /etc/transmission-daemon
Before editing, you need to first stop transmission-daemon service, otherwise settings.json will revert to default state when you will reboot your server. Use this comman to stop this service:
service transmission-daemon stop
Then you can start with editing settings.json file. When you finish with editing, save this file and upload it back to the server using FTP of course. Use this command to start the service again:
service transmission-daemon start
Transmission will now start and settings should not be erased this time. Transmission can be access via http://YOURSERVERIP:9091/
I suggest that you install Transmission Remote GUI on your PC (if you have Windows OS). Its great piece of software and enables you to add or remove new torrents with ease.
8. STEP
Now you can install other stuff too, it depends what you want. If you want to use server for OScam and CCcam, please also check my other tutorials on this site. Installing CCcam is easy. Download CCcam 2.1.3 for x86 linux and put it in usr/local/bin folder. Then create /var/etc folder. You need to put CCcam.cfg file here. This is main configuration file for CCcam, very important!
If you want that CCcam starts automatically when you start your server, use Webmin! Just check image that you can find below if you want to see how to create cronjob in order to enable autostart of CCcam. You can do the same for OScam too 😉 OScam installation is a bit harder because you need to compile it. On this you can also find tutorial about compiling OScam on Ubuntu.
Also check this pictures:


This is the end of this quite long tutorial. If you have any questions, just leave a comment!
